Do you want to set up a testing environment or learn web development? XAMPP is the tool that you are looking for. A single package of XAMPP contains Perl, PHP, MySQL, and Apache. It makes local development quick and less hassle. Learn to install XAMPP Windows to ease your development.
Table of contents
What is XAMPP? Why do you need XAMPP?
XAMPP is a free open-source package from Apache Friends. The name means:
- X – Cross Platform (available on Windows, macOS, Linux)
- A – Apache (web server)
- M – MySQL (database server)
- P – PHP (programming language)
- P – Perl (scripting language)
Developers host websites locally through XAMPP on their devices before the sites are published online. This is a fine way to manage databases, run PHP scripts, and test websites without having an internet connection.
Frequent uses of XAMPP include:
- Locally set up WordPress
- Running PHP-based programs
- Testing web dev projects before they are deployed
- Shaping a sandbox environment for experimentation
Full Process of XAMPP Windows Installation
Now, the moment of truth for you: here come detailed steps on how to install XAMPP on Windows.
Download XAMPP Windows
Visit the official website of Apache Friends. Start the download by clicking on “XAMPP for Windows.” Choose the latest version that is compatible with your Windows.
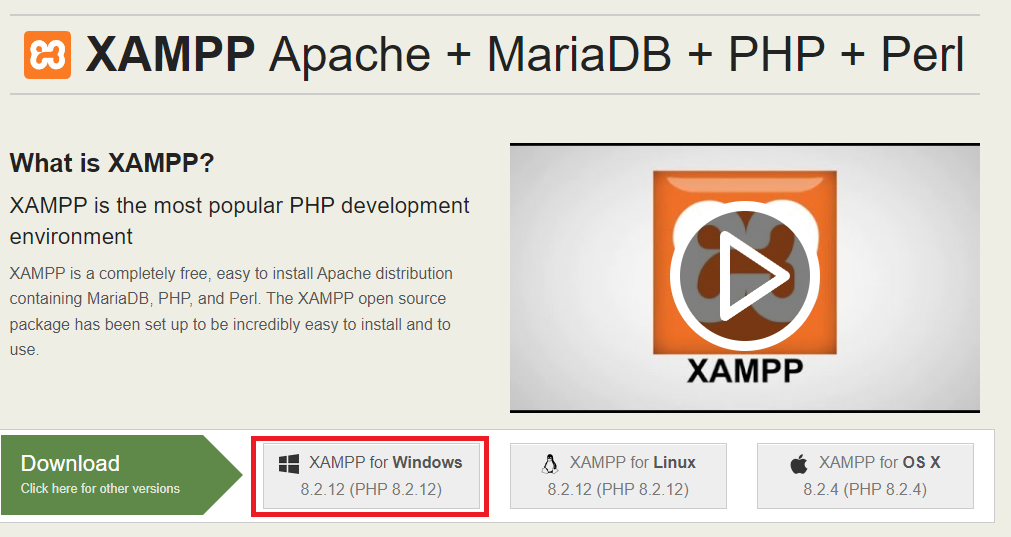
Keep in mind that older versions of PHP-based applications require compatibility at their level. Download the XAMPP version that is compatible with your version of PHP.
Launch the XAMPP Installer
The setup file is usually named “xampp-windows-x64-x.x.x-installer.exe”. Download it and click on the installer. Click “Yes” to allow installation when you see a Windows User Account Control (UAC). There might be another warning of antivirus interference. Click OK to continue.

Short & Direct with Hostonce!
Do not stop now! You are almost there! Use the Hostonce guides and be ready to run MySQL and PHP like a pro. Take the steps that lead you to run your website locally!
Installation Components
XAMPP allows you to choose which components you want to install. You will see multiple options like:
- Apache
- FileZilla FTP Server
- Mercury Mail Server
- MySQL
- Tomcat
- PHP, phpMyAdmin, Perl
The default selection (phpMyAdmin, PHP, MySQL, Apache) is best for most users. You are free to leave others unchecked and click Next to proceed.
Installation Folder
It is up to you where you want to install XAMPP. C: \XAMPP is the default path. It is usually recommended to stay with the default directory so that there are no permission issues ahead. Click Next.
Installation Process
To install XAMPP Windows is no challenge. The setup will begin to extract all the selected components. It may take up to several minutes, which totally depends on your system performance. Click Finish to complete when the process is done.
Launch XAMPP Control Panel
The XAMPP control panel will open automatically once the installation is finished.
The modules can be seen for:
- Apache (Web Server)
- MySQL (Database)
- FileZilla, Mercury, and Tomcat (Optional)
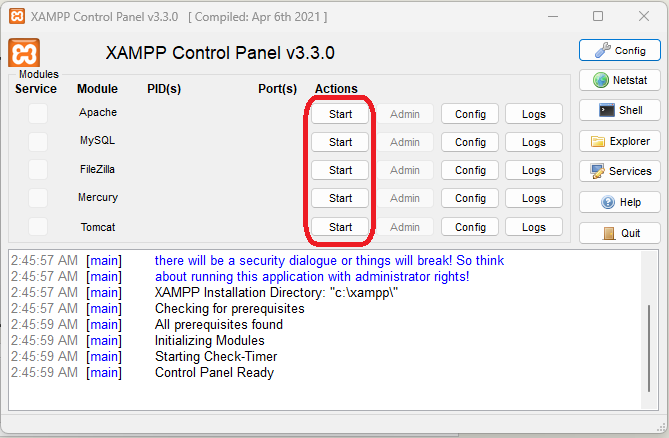
Start your local server like:
- Click Start next to MySQL and Apache.
- The module background will go green. It indicates both are running.
A Windows Firewall prompt may show up. Allow access so that there are no connection issues ahead.
Verification of XAMPP Installation
XAMPP is running successfully. Good! It is time to open your browser and type “http://localhost/”. You should be seeing the XAMPP welcome page to confirm it is working well. You have successfully installed and configured XAMPP on your PC. Congratulations!
Access phpMyAdmin
XAMPP has phpMyAdmin. It is a web-based tool for MySQL database management. Type “http://localhost/phpmyadmin/” to access it. Use it to:
- Create new databases
- Import or export data
- Manage tables and records
- Run SQL queries
- Project Folder
The htdocs folder is where you can place your project files inside your XAMPP directory, which is “C:\xampp\htdocs\”. For instance, make a folder called mywebsite and your website can be accessed at “http://localhost/mywebsite/”. You are free to develop or test your website locally now.
Management of XAMPP Services
The XAMPP control panel is a treat that allows you to manage and stop services easily:
- Click Stop to turn off MySQL or Apache when you are done.
- Click ‘Config’ and ‘Auto-start modules’ to run XAMPP on Windows automatically.\
Ensure that you avoid conflicts by always stopping services before shutting down your PC.
On a separate note, if you’re searching for reliable shared hosting, be sure to check out Hostonce.
Usefulness of XAMPP Services
The main point is to set up and run XAMPP. You can optimize it for better convenience and performance afterwards.
Fine-tuning your PHP settings should be the first step. Go to the XAMPP Control Panel. Open the php-ini file so that you can increase the “upload_max_filesize” or “memory_limit” values. They help you work with upload-heavy websites and large databases. It keeps your local environment safe from crashing during development that relies heavily on memory.
Configuring virtual hosts is another useful step. It saves you typing “http://localhost/myproject/” whenever you have to create personalized URLs such as “http://myproject.local/”. Virtual hosts stimulate a real hosting setup and make your workflow cleaner rather accurate.
A big plus point of XAMPP is that it can be used offline. Even if it can be used offline, do not forget to set a password for your MySQL root user to secure phpMyAdmin. This act develops security habits, which in turn keep local projects off unwanted access.
Summary
To install XAMPP Windows is not challenging at all. It is quite an easy way. Using XAMPP gives you enough room to experiment with MySQL and PHP, build WordPress sites, and test projects.
Visit Hostonce today for similar helpful articles!
Frequently Asked Questions
Is XAMPP free?
Yes. XAMPP is a free and open-source software.
Is XAMPP supported on Windows 11?
XAMPP is supported on Windows 11, Windows 10, and even on older versions.
Where to place websites in XAMPP?
You should place the files in the “C:\xampp\htdocs\” folder so that they are easily accessible via “http://localhost/”.
How to start or stop XAMPP services?
You can start and stop MySQL and Apache from the XAMPP Control Panel directly.