Many users often wonder how to switch their websites to HTTPS or secure them with SSL. While the terms may sound technical, the process is actually quite simple. When your website uses HTTPS in its URL, it means that data is transferred securely through an SSL certificate. This is essential because modern browsers often warn users when they visit sites that don’t have HTTPS.
In this write-up, we’ll demonstrate how to move a WordPress website from HTTP to HTTPS on your VPS by installing an SSL certificate.
Table of contents
Why HTTPS and SSL Matter
HTTPS, short for Secure Hypertext Transfer Protocol, protects the data shared between a user’s web browser and your server by encrypting the connection. This type of encryption stops outsiders from viewing or altering any data sent between the two ends.
Every day, people share personal information online, whether they’re logging in, submitting forms, or making purchases. Ensuring this data is protected is essential, and that’s where HTTPS and SSL step in to ensure a safe and encrypted connection.

Switch to Hostonce shared hosting and get a free SSL certificate to move your site from HTTP to HTTPS effortlessly. Enjoy fast, reliable hosting and keep your website safe.
Every website is assigned its own SSL certificate, and today’s browsers warn visitors if a site attempts to use HTTPS without a valid or verified certificate.
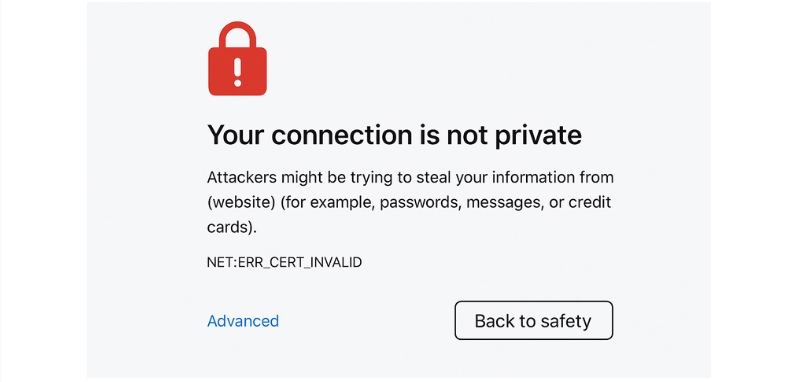
Beyond security, HTTPS has become a standard expectation for websites. Since 2018, Google has encouraged site owners to switch from HTTP to HTTPS, and its Chrome browser now flags non-secure sites with a “Not Secure” warning. This can negatively affect visitor trust and even your site’s credibility. Additionally, sites using HTTPS may gain SEO advantages, potentially improving search rankings.
For websites handling payments, SSL is mandatory, as providers like Stripe, PayPal, and Authorize.net require a secure connection. Even if your WordPress site is small or doesn’t process transactions, moving to HTTPS ensures trust, protects data, and keeps your site aligned with modern web standards.
Moving WordPress from HTTP to HTTPS on Your VPS
Switching your WordPress site to HTTPS ensures a secure connection for your visitors and improves trust and SEO. First, install an SSL Certificate and then follow these simple steps to move your site from HTTP to HTTPS on your VPS.
Install an SSL Certificate
Using SSL on your WordPress site is straightforward and doesn’t require many steps. First, you need an SSL certificate, which may already be included for free with your hosting plan. Several trusted hosting companies, such as Hostonce, provide free SSL certificates for WordPress users, allowing you to secure your website effortlessly without additional charges.
However, if your hosting package doesn’t include a complimentary SSL certificate, you can still purchase one on your own. Paid SSL certificates provide extra security features, such as a site seal and a warranty, ensuring your visitors know your website is safe.
Once you’ve acquired an SSL certificate, just request your hosting provider to set it up on your server. After this, your WordPress site will be ready to run on HTTPS, keeping your visitors’ data protected and improving trust and search engine credibility.
Update WordPress Address Settings
Log in to your WordPress dashboard, go to Settings and then General, update both the WordPress Address (URL) and Site Address (URL) from http:// to https://, and press Save to confirm the changes.
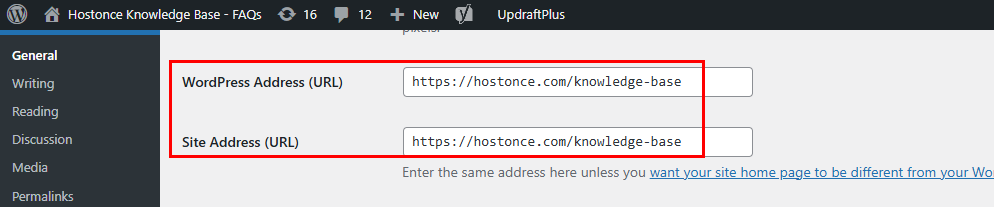
This tells WordPress to load all pages over HTTPS.
Update Your VPS Server Configuration
If you’re using Apache, update your .htaccess file or the virtual host configuration to redirect all HTTP traffic to HTTPS. For Nginx, add a server block that redirects HTTP requests to HTTPS. This ensures all visitors automatically use the secure version of your site.
Update Links, Content, and Verify SSL
After installing SSL, check your website for mixed content such as images, scripts, or stylesheets still loading via HTTP. You can use a plugin like Really Simple SSL or manually update your database to ensure all URLs use HTTPS. After completing the setup, open your website using https:// in your browser. If a padlock symbol appears in the address bar, it means you’ve a secure connection.

You can also verify the installation by using online tools such as SSL Checker to ensure your SSL certificate is active and functioning properly.
Enable Automatic Redirects
Ensure that your server automatically redirects HTTP traffic to HTTPS. This protects visitors who try to access the old HTTP version and improves SEO by avoiding duplicate content issues.
Test Your Website
Finally, go through your website, test forms, links, and plugins to make sure everything works correctly over HTTPS. After confirmation, your WordPress site is fully secured with SSL.
Conclusion
Moving your WordPress site from HTTP to HTTPS strengthens security, builds trust, and improves SEO performance. Install an SSL certificate, update your WordPress and server settings, and verify your configuration to ensure all data transfers occur through a secure, encrypted connection. This setup protects user information, prevents browser security warnings, and enhances your site’s credibility. Running your WordPress website over HTTPS ensures it remains safe, trustworthy, and aligned with current web security practices.
FAQ
Is SSL required if I don’t accept online payments?
Even if your website doesn’t process any transactions, having an SSL certificate remains essential. It protects login details, contact form submissions, and other sensitive user data. It also ensures your website appears professional and trustworthy.
Will switching to HTTPS affect my SEO?
Yes, but in a positive way. Google gives preference to secure websites, so moving to HTTPS can slightly improve your ranking. It also helps avoid “Not Secure” warnings that could drive visitors away.
Is technical expertise required to configure an SSL certificate on my VPS?
Not much. Most hosting providers handle the installation process for you. Afterward, simply adjust your WordPress and server configurations to activate HTTPS.