Setting up a cPanel redirect is a powerful and simple way to guide visitors from one web address to another. Redirects ensure that search engines and users are redirected to the right location. Visitors may encounter errors or broken links if there are no redirects. These issues can hurt your SEO performance and site reputation.
Table of contents
Key Takeaways
- Successful cPanel Redirect is a happy ending for everyone!
- Knowing when to Set Up a cPanel Redirect is the key!
- The Redirects Section is Accessible in cPanel!
A Guide with Steps for a Successful cPanel Redirect
Willing to set up a cPanel redirect? Go to Domains and then Redirects. Select the redirect type and the domain. Specify a path to be redirected if it is applicable. Choose between the root or the www domain. That is the process made simple. There are steps to consider; let us go!
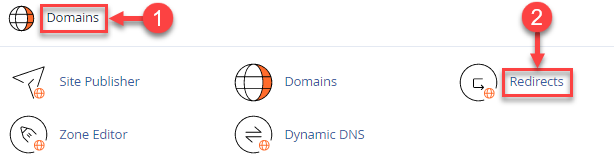
Step 1: Access the Redirects Section in cPanel
Use your hosting credentials to log in to your cPanel account. Look for the Domains section once you are on the cPanel dashboard. Click on “Redirects” under this category. This section allows management of all your redirects from the same place. That makes it easier to control how visitors are routed through your website.
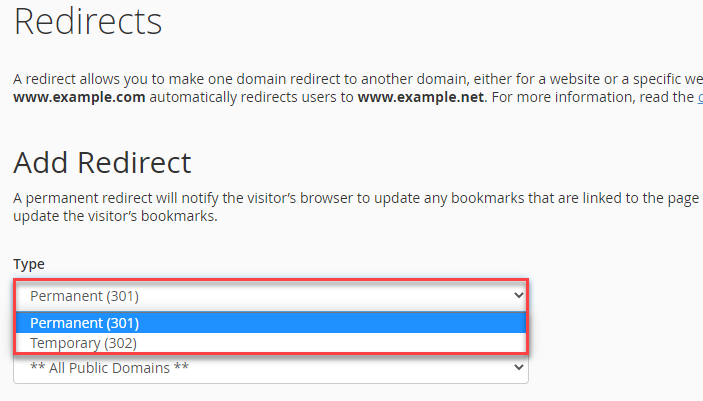
Step 2: Select the Redirect Type
You will be prompted to choose the redirect type you want to create in the Redirects interface. This is a crucial step. Consider the following for the redirect type:
World Card Redirect
This type redirects all files within a directory to the redirected directory of the same filename.
Temporary 302
This comes in handy when the redirect his temporary. For example, if your website is under maintenance.
Permanent 301
Use this type if you plan to no longer use the original URL. This option is recommended for SEO as this is how you can keep the search ranking of the last domain.
The redirect will appear at the bottom of the page once it is created.
Step 3: Select the Domain and Path
Done selecting the redirect type? Now choose the domain name from the drop-down menu. Your cPanel account likely hosts multiple domains. Make sure you select the right one.
Specify the path you want to redirect. Leave the path field blank if the plan is to redirect the entire domain (like all visitors from example.com to newsite.com). You can define that path if you want to redirect only a specific path ( redirect example.com/contact to newsite.com/support).

Simplify your website management with Hostonce!
Use Hostonce’s reliable cPanel hosting to set up seamless redirects. Smooth navigation and full SEO retention with zero downtime!
Step 4: Configure “WWW” Options
You will be asked to choose how the redirects are to handle “www” versions of your website. You can:
- Redirect only with www if you wish to include it in the URL.
- Redirect with or without www as both versions redirect to the targeted URL.
- Redirect only without www to keep up a non-www version of your website.
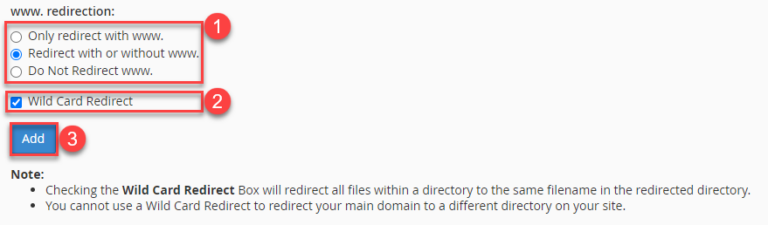
Step 5: Add the Redirect Destination
Enter the full URL of the destination page in the “Redirects to” field. Check the URL twice for accuracy. Any typo could redirect visitors to the wrong page or entirely break the redirect.
Step 6: Create and Verify the Redirect
Click “Add” to create the redirect once everything is done. Your newly created redirect will be listed under “Current Redirects” at the bottom of the page. You can delete it anytime from this section. Just visit the original URL to verify if it is working well. You should be redirected to the new destination.
Information to Ponder When Setting Up a cPanel Redirect!
Never forget to check the URLs twice to avoid redirect errors or loops. You do not want visitors or search engines confused. Test your redirects after creation to verify how well they work. Include the full URL with the correct protocol when redirecting to an external website. Consider editing the .htaccess file for complex redirect needs. These needs include using regex or redirecting based on specific conditions.
You will have to stay cautious because incorrect changes can break your website. A cPanel redirect helps to preserve SEO for your website and maintains a seamless user experience. This is how to set up redirect in cPanel.
You may read another cPanel redirects article if none of this makes sense. We tried! Give us a high five and follow our knowledge base for further similar articles!
Conclusion
Setting up a cPanel redirect might seem technically challenging at first. It is a straightforward process in reality. This practice is essential for SEO integrity and smooth website navigation. Each redirect type serves a particular purpose in the management of traffic flow effectively. Follow the steps our expert team suggest to make sure your visitors reach the right content whether you create 301 redirect in cPanel or any other type.
Frequently Asked Questions
Can I redirect an entire website to another domain in cPanel?
Yes. Just leave the path field blank and enter the new domain in the “Redirects to” field. This will redirect all traffic from your old domain to the new one.
What is a Wild Card Redirect used for?
A Wild Card Redirect helps you redirect all files in a directory to another directory with the same filenames. It is useful when moving an entire section or folder of your website.
Does a cPanel redirect affect my SEO?
Only if it is done wrong. A 301 redirect helps preserve your SEO ranking. A 302 redirect should be used with care because it does not transfer SEO authority.
How do I delete or edit an existing redirect in cPanel?
Go to Domains and Redirects. Scroll down to the “Current Redirects” section. Click Remove or Edit next to the redirect you want to modify.